¶ Admin Portal Documentation
This guide is to help you administer the Rinble phone system through the web based administration portal located at https://admin.rinble.com.
¶ Auto-attendants
Automated attendants present a message to the caller and can be used to answer the phone or used as back up to a human reception. Each attendant can be attached to a schedule to accomodate your business hours with different recordings played during and after hours.
While listening to an attendant, a caller can dial any existing extension or dial specific attendant extensions only available to that attendant.
¶ Creating new auto-attendants
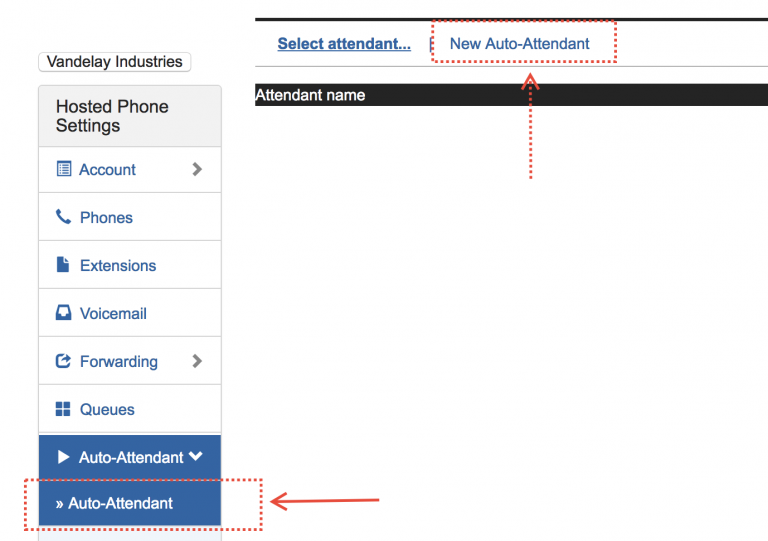
- Select Auto-Attendant on the left navigation bar under Administration
- Select New Auto-Attendant from the top navigation.
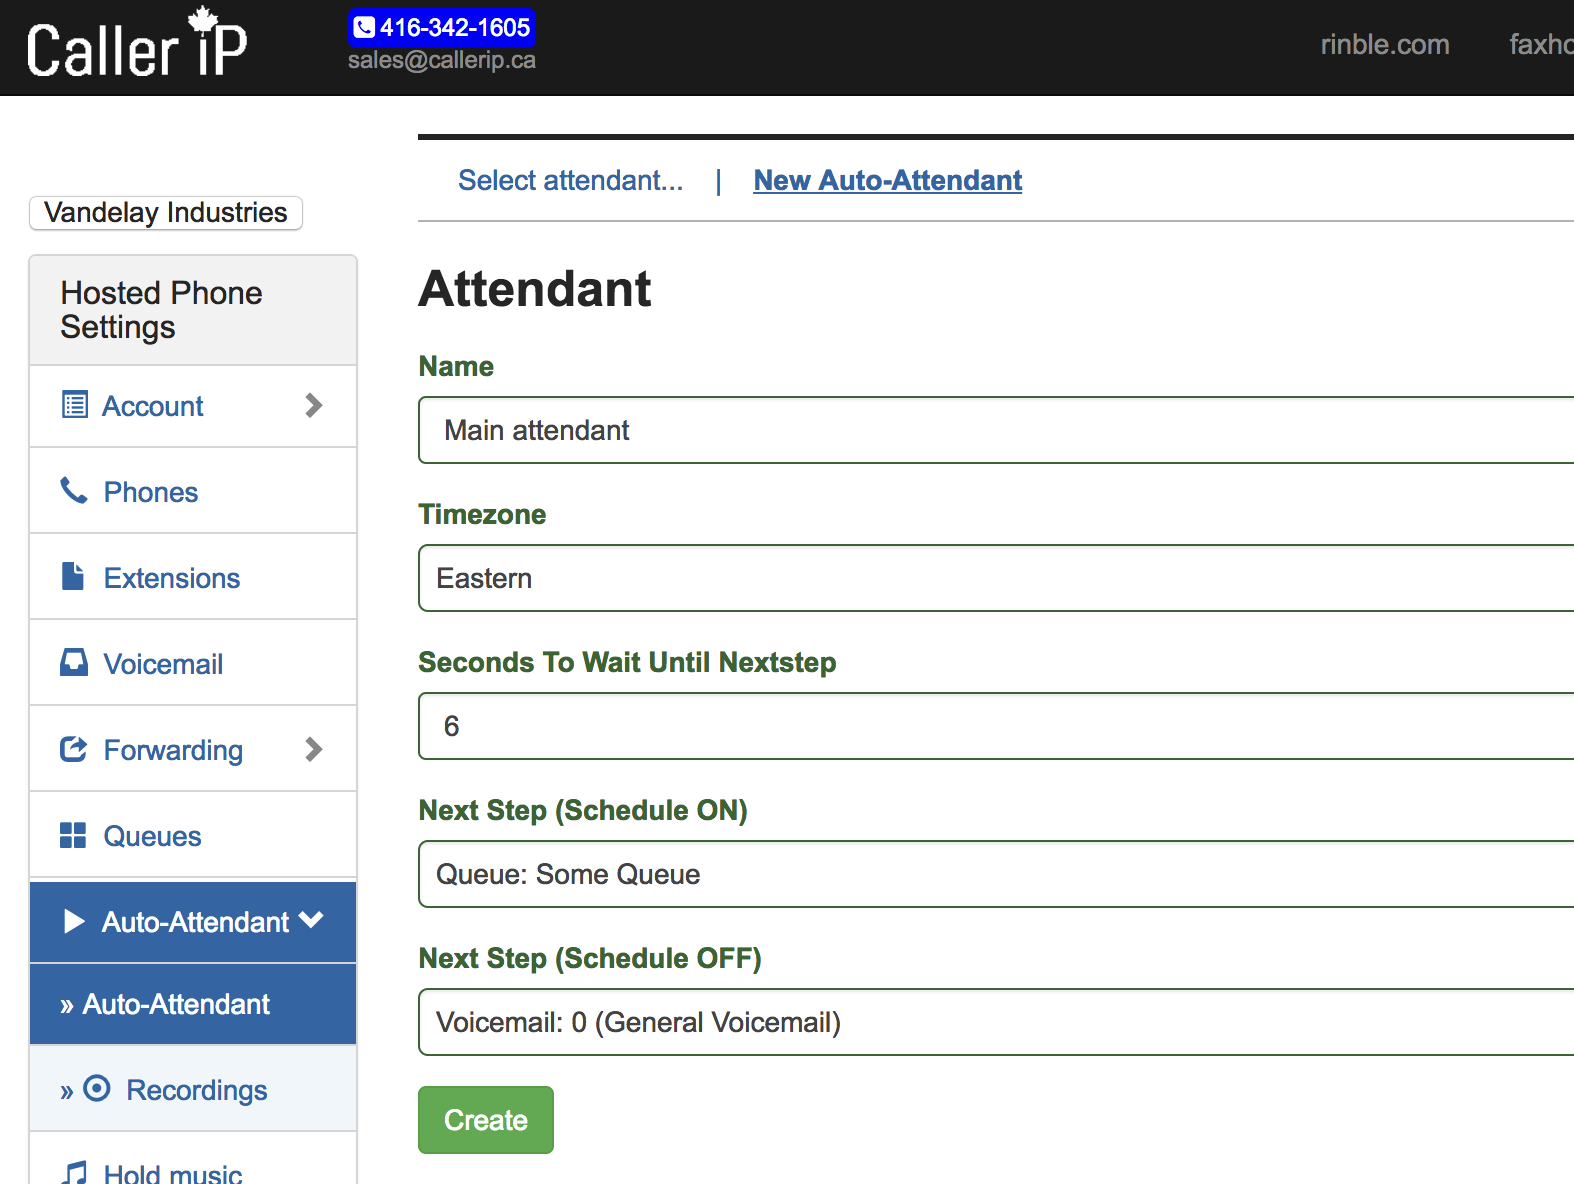
- Set the basic options including name, timezone and the failover destination.
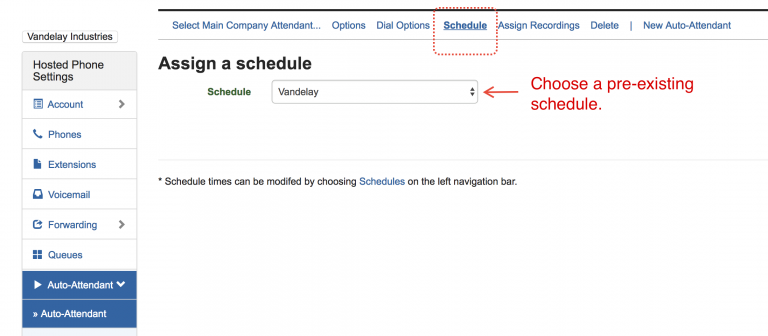
- Set the schedule for business hours and after-hours
- Assign the recordings (assuming you have already created the recordings)
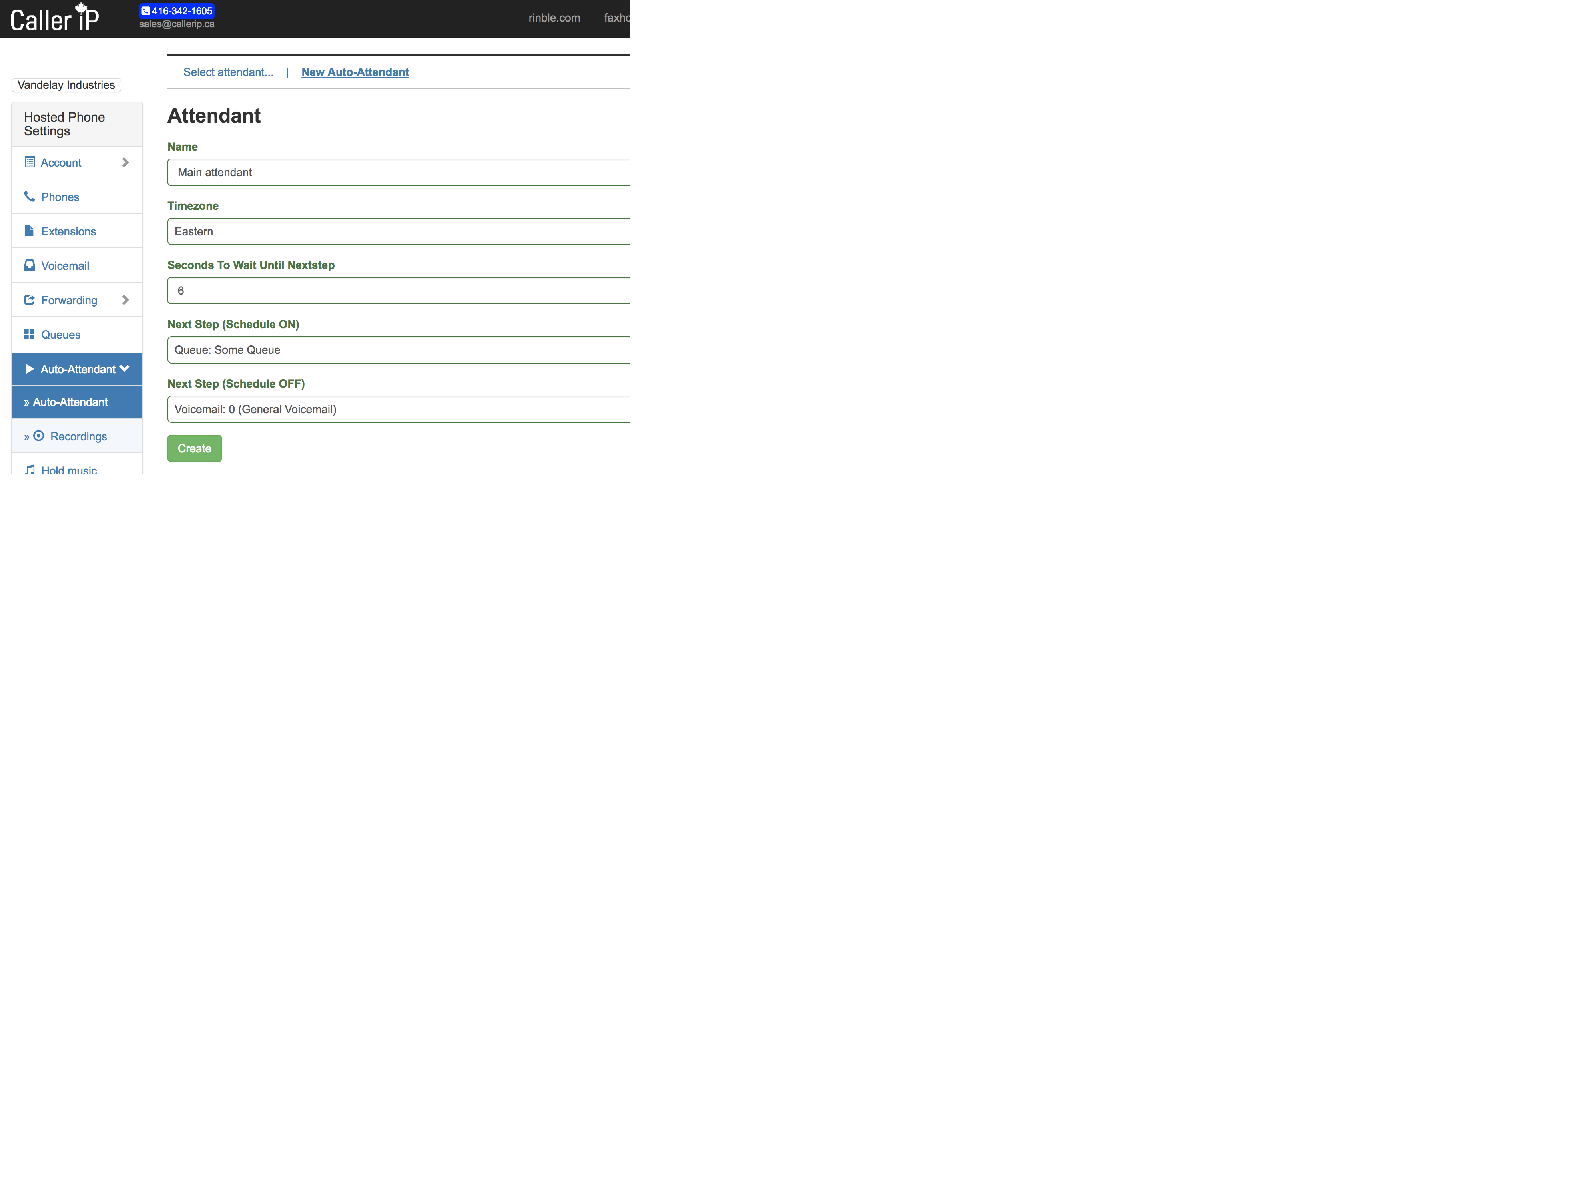
¶ Options screen
| Field | Description |
|---|---|
| Name | Your name for this attendant |
| Timezone | The timezone this attendant’s schedule should operate in. If your organization operates across multiple timezone’s you could have an attendant for each, with the schedule set accordingly. |
| Seconds to Wait Until Nextstep | This is the number of seconds to wait after all the recordings have played before moving on to the failover destination. |
| Failover Destination | After the attendant recordings have played, and if the caller has not chosen an option, the system will route the the caller to whatever failover destination is set too. You may choose a voicemail, another attendant, or even the same attendant to have it play again. To choose the same attendant, you will have to create it first, then go back to the Options page to select it as a failover destination. |
¶ Scheduling
Attendants can follow schedules to play different recordings during "on" and "off" periods. When the schedule is “on” your business-hours recordings will play; and when the schedule is “off” your after-hours recordings will play.
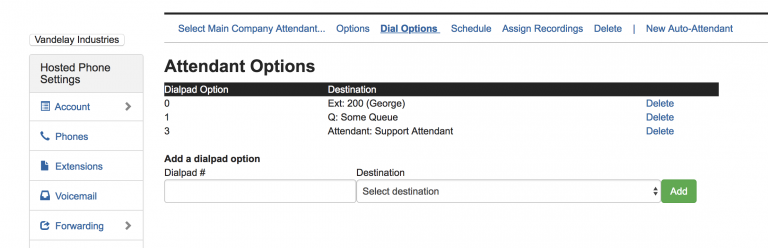
¶ Dial options
Attendants will listen for phone extensions, queue extensions and dial options. Phone extensions and queue extensions are global, meaning that they are available in any attendant. Dial options, however, are specific to the attendant and not available elsewhere in the dial plan.
When a caller presses digits in an attendant, the system will first check to see if those digits match an attendant dial option, then check to see if the digits match a queue extension, and then finally a phone extension. So if 200 was an attendant option, a queue extension and a phone extension, only the attendant dial option would become activated if the caller dialed it.
Each dial option can have its own destination. For instance 1 might send someone to the sales queue, and 2 might send someone to an extension or even a voicemail.
¶ Recordings
(For call recording see the phone section)
Recordings played to the caller and can be assigned to auto-attendants and/ or music on hold profiles.
¶ Creating the Recording
¶ Setup and name the recording
- Click on Auto-Attendants -> Recordings on the left navigation panel.
¶ Automated voice (Text to speech)
To use an automated voice:
- Select Auto-Attendant -> Recordings on the left navigation
- Select the recording
- Select Text to speech in the top navigation
- Enter the text you want the computer to say.
- Choose Generate Speech.
¶ Record by phone
Most recordings (with a human voice) are done using a phone. All of Caller IP’s phones have high quality microphones built specifically for human voice; our phones will often record an attendant message better than most other microphones.
- Select Auto-Attendant, then Recordings on the left navigation
- Select the recording
- Select Record by phone in the top navigation
- Follow the onscreen directions.
¶ Upload an audio file
If you have already recorded an announcement or music and have a sound file (mp3 or wav format) you can upload with the following steps:
- Select Auto-Attendant Recordings on the left navigation
- Select the recording
- Select Upload file in the top navigation
- Select the choose file button and choose the file to upload.
- Click the Submit button.
¶ Assign Recordings
¶ Schedule Profiles
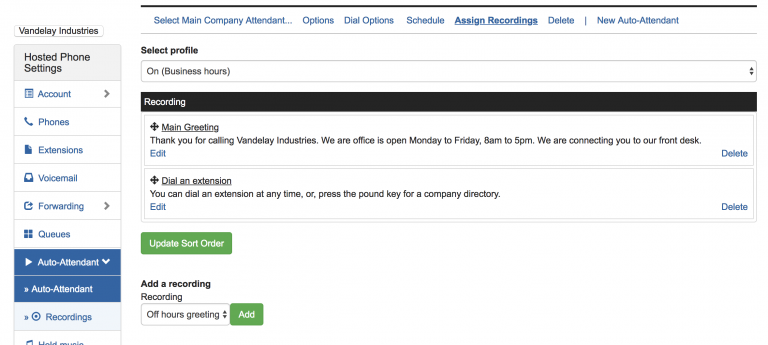
Recordings are not assigned directly to the attendant, instead, they are assigned to one of the attendant’s schedule profiles. Attendants have a business hours (On) profile and an after-hours (Off) schedule profile. Each schedule profile can be assigned recordings and scheduled separately.
Recordings are assigned to a profile in the Assign Recordings link in the top navigation.
- Select auto-attendant on the left navigation
- Select Assign Recordings on the top navigation
- Choose the profile – either business hours or after-hours
- Select and add the recordings.
- Recordings will be played in the order they are added to the system.
¶ Specific Time
Specific schedules can only be assigned one recording.
¶ Chaining Recordings together
For the business hours and after-hours profiles, multiple recordings can be chained together to be played one after another. This is handy where your business hours and after-hours recordings share much of the same wording. For example, your business hours recordings might say “thank you for calling Caller IP” and the after-hours recordings may say the same thing but also say “the office is now closed.” In that scenario, Recording 1 would say “thank you for calling Caller IP” and Recording 2 would say “the office is now closed.” The business hours profile would only play Recording 1 but the after-hours profile would play Recording 1 and Recording 2.
¶ Common Setups
¶ Human reception + After-hours attendant
You may choose to have a human answer the
¶ Attendant + Human Reception
You might choose to have the attendant pick up right away to give the caller a short message* and give the caller a chance to dial by extension. Then, if the caller still needs help, they can remain on the line or press a number, to speak to a human reception.
This method has a number of advantages:
- Callers who know the extension they want to dial can skip the human interaction.
- This is a popular way to notify the caller that there call is being recorded.
Thank you for calling Please wait while we connect your call. If you know the extension of the party you are looking for you may dial it now. Please note this call is being recorded [for quality assurance purposes].
¶ Schedules
Your phone system’s schedule can match your office hours. You may wish to play a different greeting on your auto-attendant when the office is closed. Or you can have some phones to go straight to voicemail after a certain time. Rinble’s schedules allow you to define a custom schedule and apply them to multiple phones and services.
On their own, a schedule doesn't do anything; but schedules are used by other components of the Rinble system, such as auto-attendants, queues, extensions, call hunting, and more. With schedules, you define two states “On” and “Off” to occur at certain times throughout the week. Each Rinble phone or service (auto-attendant, queue, etc...) that uses the schedule can behave differently depending on whether the schedule is on or off. For example, if an extension subscribes to a schedule which is currently “off”, any calls to it will skip the extension and go to the extensions next step (which is often a voicemail or a call-hunt).
Auto Attendants are a special case and never turn off in the way an extension or a call hunt does. Instead, when the auto-attendant’s schedule is off, the auto-attendant’s after-hours recordings are played to the caller; and, likewise, when the schedule is on, the business-hours recordings are played to the caller.
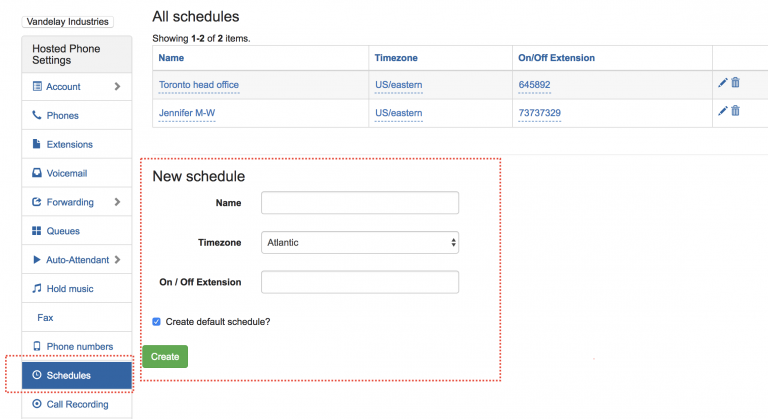
¶ New schedules
To create a new schedule, select “Schedules” on the left panel and then fill out the “New Schedule” form under the list of current schedules.
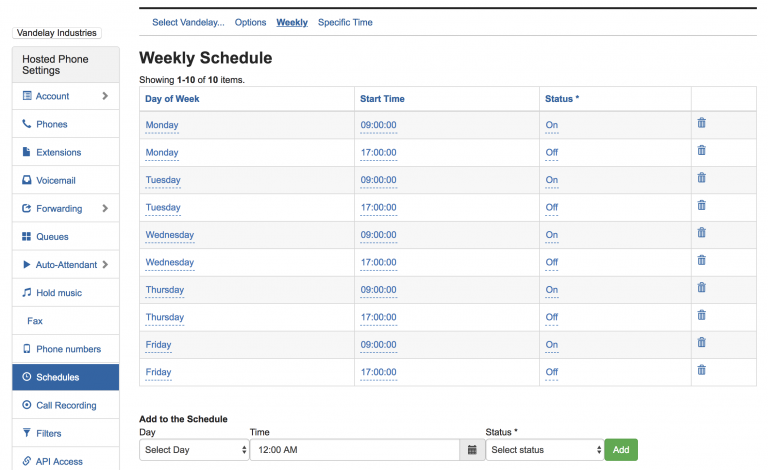
¶ Weekly schedules
Schedules are created on a weekly basis. That means you can set On and Off times for each day of the week. So, for example, on Mondays your schedule could turn on at 10am and off at 5pm; but on Tuesday’s your schedule can turn on at 9am and end at 4pm.
To add a new weekly entry, use the form at the bottom:
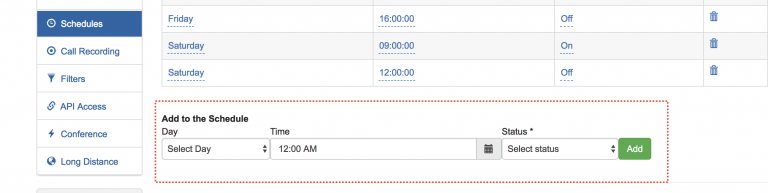
¶ On / Off codes
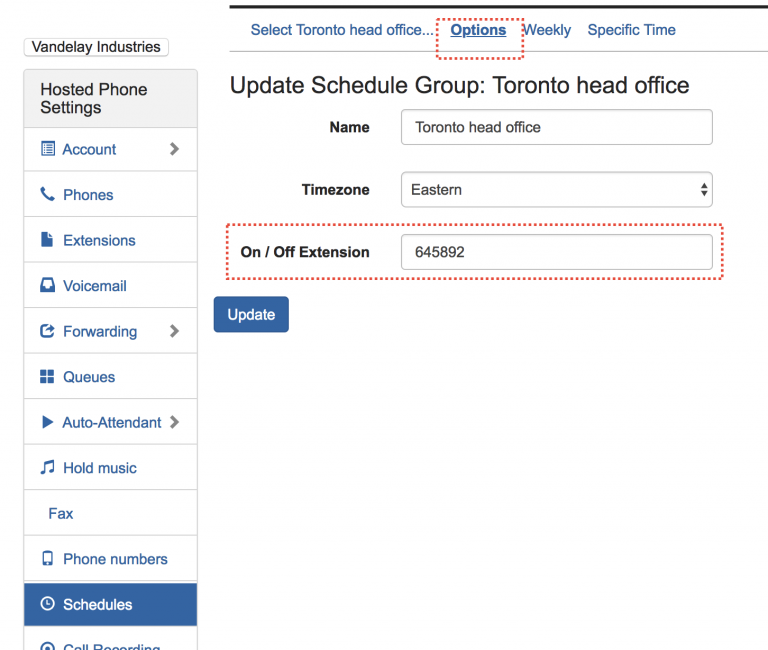
Every schedule has an On / Off pin you can dial from any of your phones to flip the current status to on or off. The status, however, will flip back at the next scheduled interval.
For example, if the current status is “on”, its 4:30pm and you want to close the the office early (you want your auto-attendant to say the office is closed), you can dial the on/off pin to turn the schedule to “off”. The schedule, however, will turn back to “on” at the next time it is normally scheduled to; meaning that your auto-attendant (or anything else that follows the schedule) will turn to “on” at 9am the next morning.
¶ Overrides
A weekly schedule covers the usual scheduling needs, but there are specific times when perhaps your office is closing early one Friday afternoon, or you want to play a different recording on a holiday. The Specific Time link on the top navigation bar is designed to allow you to create one-off scheduling events where you can play an alternate recording in an auto-attendant and/or turn off your extensions on holidays. Events scheduled using the Specific Time link will override the weekly schedule.
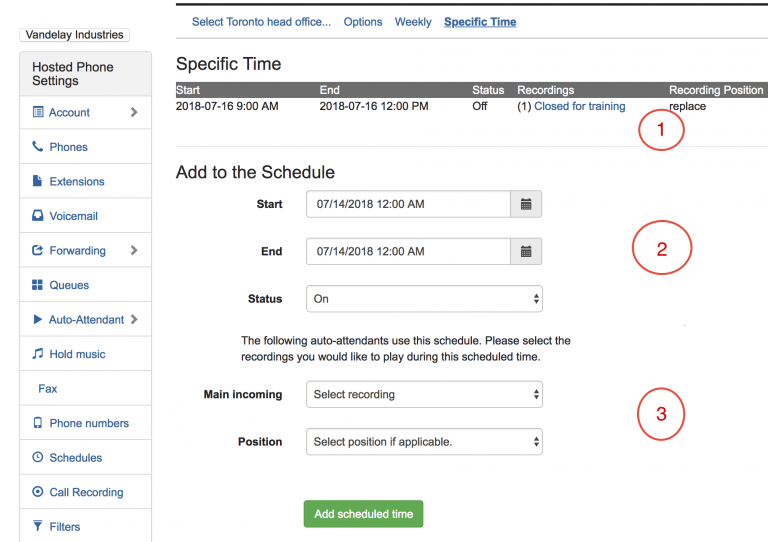
In the above screenshot, (1) shows a scheduled override on July 16 from 9am to 12pm; during that time the auto-attendant will play the closed for training recording instead of the regular recordings. (2) is the form to add a specific time and set the schedule to on or off. (3) is specific to auto-attendants; it allows you to select the recording that will play for that auto-attendant during the schedule override.
¶ Applying the schedule
¶ Auto-attendants
You can assign your schedule to your auto-attendant. When the schedule is “off”, the after-hours recordings will play; and when the schedule is “on” the business hours recordings will play.
¶ Queues
You can assign your schedule to any queue. When the schedule is set to “off” the dial plan will skip the queue and send the call to the queue’s next step.
¶ Extensions
Assigning a schedule to an extension allows the extension (and the phone it rings) to ring when the schedule is set to ‘on’ and to not ring, and send the caller to the extension’s next step when the caller is “off”.
¶ Queues
A queue is a group of phones that can answer the same extension. For example, if two people share responsibility for answering your main line, you may want to create a “Reception” queue that rings both phones at the same time when the number is called.
Most of the time, a queue is used to make two or more phones ring for the same extension. However, queues can implement more advanced ring strategies ring strategoies to enable call centre functionality.
¶ New Queue
To create a new queue:
- Select Queues on the left panel and then New Queue at the top.
- Fill out the New Queue form then click Create.
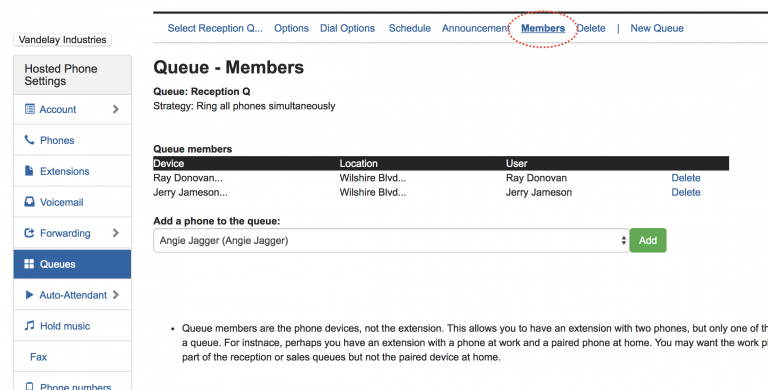
- Click Members from the top navigation and add the appropriate phones to the queue. These are the phones that will ring when the queue is called.
- Assign the Queue to a schedule.
- Set the Dial Options, if any.
| Key | Field Description |
|---|---|
| Name | Name of the queue. |
| Extension | The numeric extension you can call the queue with. For example, a reception queue might be 0 |
| Display caller name as | If you would like to know which Queue the caller is coming on, set this option to “Set the caller name to the Q name.” This way the person taking the call will know which queue the caller called. This is handy where one person / phone is managing more than one queue. |
| Next step | This sets where the call should go if the queue is not answered, or its schedule is off. |
¶ Adding phones
Add phones to the queue.
¶ Dial Options
The Dial Options screen allow you to set whether the caller hears ringing or recordings while the queue is ringing. If the caller is going to wait in the queue for a while (imagine a technical support queue) you can play music or other announcements to them.
If the queue is set to play recordings, you can give the caller dial options to navigate to other places in your phone system – for example, to skip the queue and leave a voicemail or a dial back number.
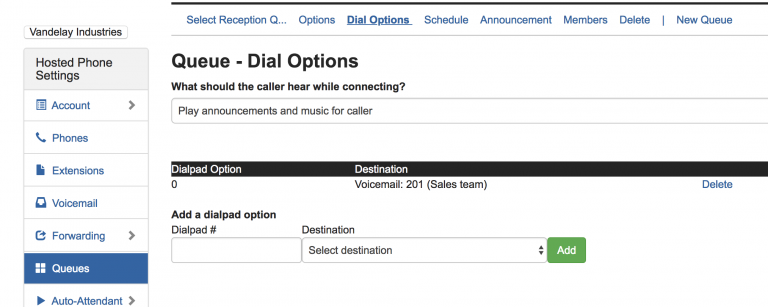
In this example, the caller can press 0 to get routed to the sales team’s voicemail.
¶ Strategies
Strategies set which member phones ring and in what order. They are set on the queue options screen.
| Strategy | Description |
|---|---|
| Ring all phones simultaneously | All phones ring until one of the phones picks up. |
| Ring least busy agent | Ring the agent with the fewest completed calls. |
| Rotate through agents | Sends the call to each agent in turn. |
| Send calls randomly to agents | Randomly selects which agent to send the call too. |
¶ Ring more phones if the queue is not answered
Frequently, companies will want a few phones to ring for a few seconds, but then have more phones ring if the call is still unanswered. This is common for reception queues where the company wants to ensure the call is not missed. The solution is to make two queues. The first queue would have 1 or 2 phones as members and, for example, would be set to ring for 10 seconds; the first queue would have the second queue set as its next step.
The second queue would have the first two phones and the additional phones as members. The second queue’s next step would be wherever the call has to go next if it is still unanswered – to an auto attendant, another queue or extension, a call forward or even a voicemail.
¶ Adding new users (and phones)
¶ Best practice
It is encouraged that you create a user in the portal for each phone user. Invoicing and licensing are itemized under each user, allowing you to see their usage data (including long distance and conferencing).
So if Susan joins your company, you first create a user account for her and then add a new phone (or reassign an existing one).
In some cases, a company may create a generic user and list multiple phones under that user. This would be used for phones that are used by various people, such as in a lunch room, or a courtesy guest phone at reception, etc.
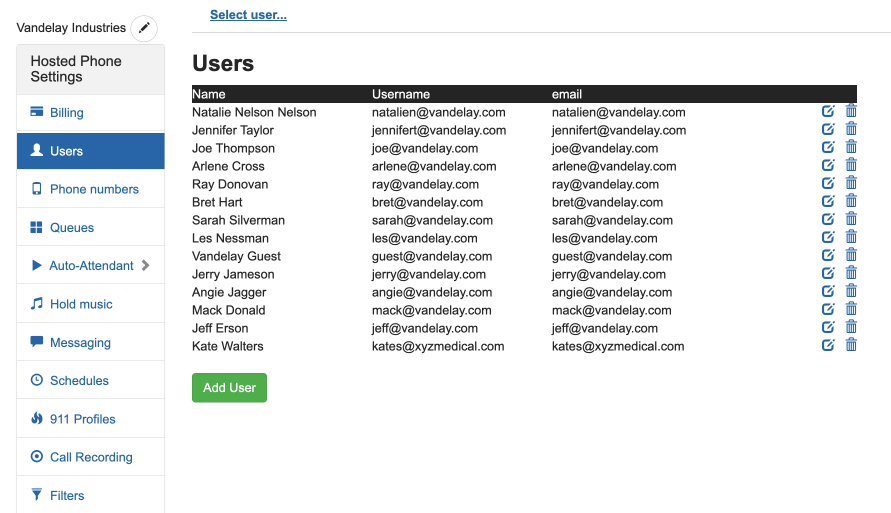
¶ Creating new users
Use the new user wizard:
- Click on Users on the left navigation panel
- Click on the green Add User button
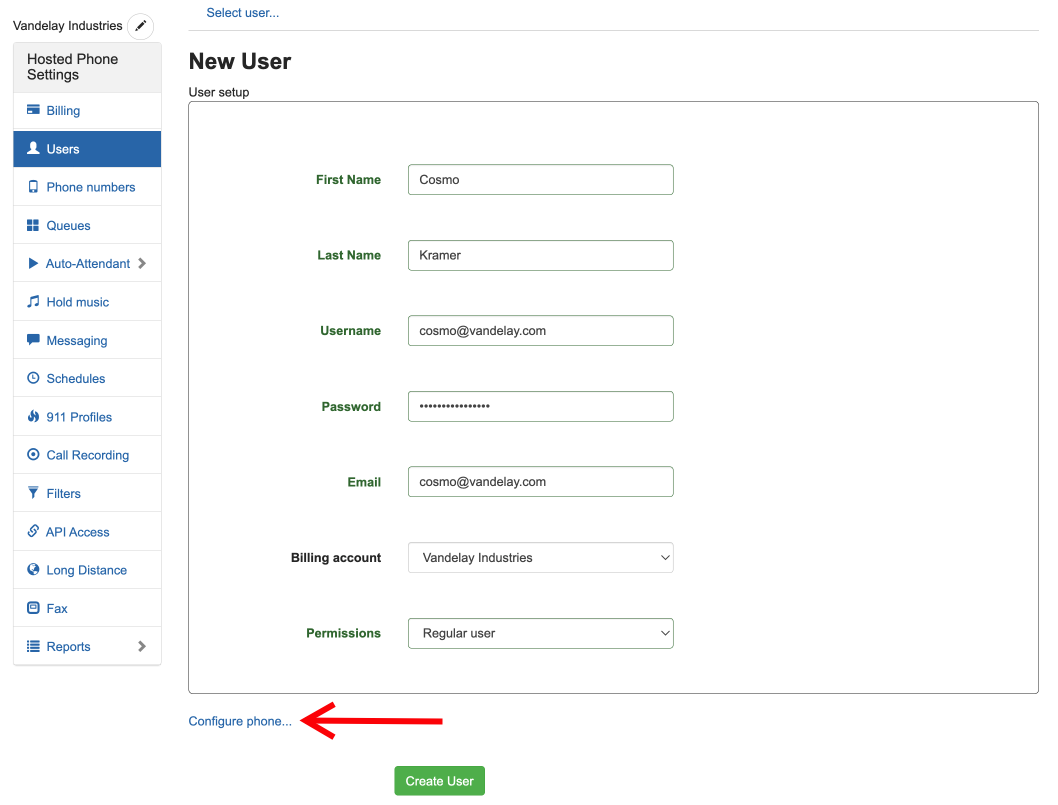
- Fill out the basic user info. For simplicity it is recommended to make user names match the user's email address.
- If you are adding a new phone for the user, make sure to click 'Configure phone' before clicking the green Create User button at the bottom.
¶ Configure new mobile phone
Select this for users who will solely use their mobile phone. While adding a new user, choose to Configure phone and select "Mobile phone (primary)". Then fill out the fields as shown below.
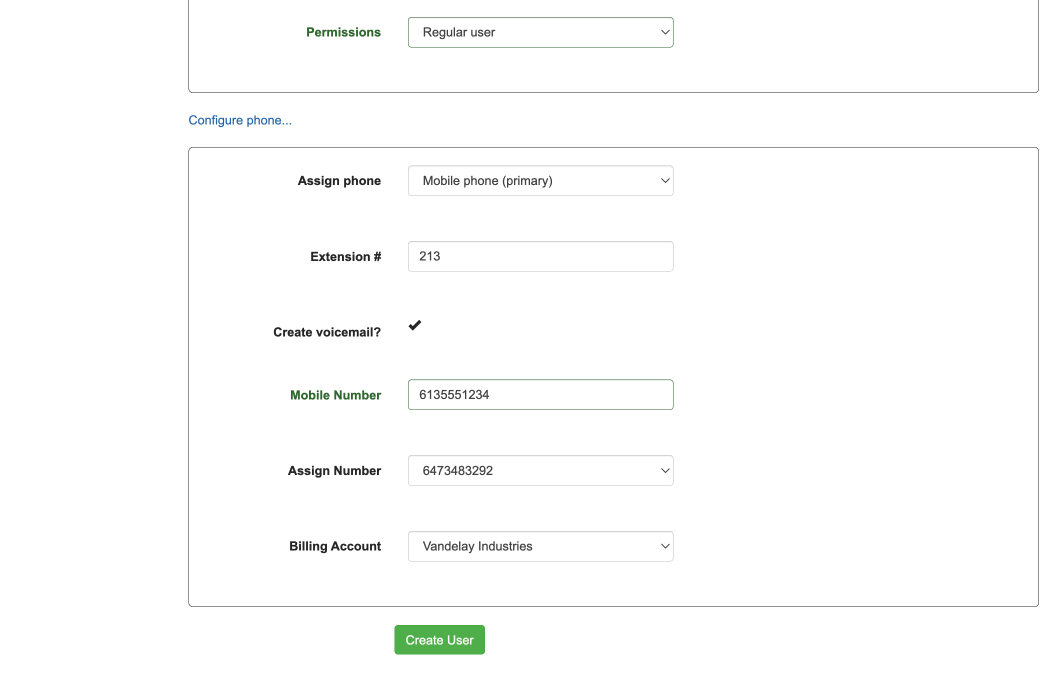
Calls to the new user will go to their mobile phone and they will be prompted to press 1 to accept the call. Outgoing calls can be placed through the Rinble mobile app.
The Mobile Number field is where you put the cell number of the new user.
Assign Number is only used if you have a company phone number (with Rinble) that you want assigned to ring directly to the new user's mobile phone.
Whether you assign a direct number or not, the extension you choose can be dialed from within your organization and by callers who enter the extension number at your company attendant recording.
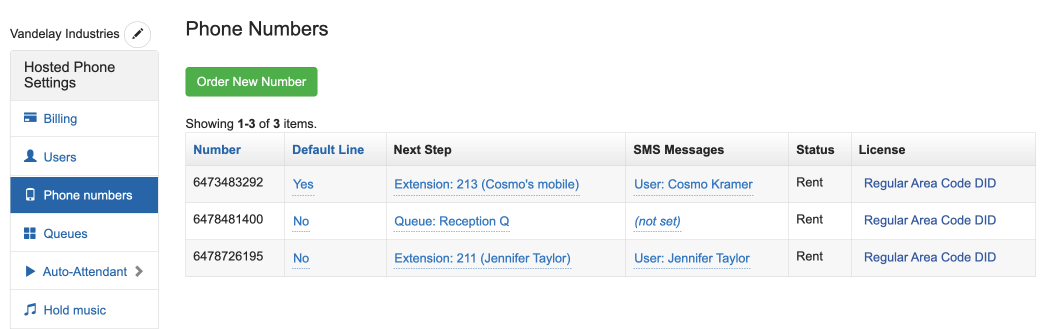
You can set (or verify) that a company number is set to the new user's extension by going to the Phone Numbers page.
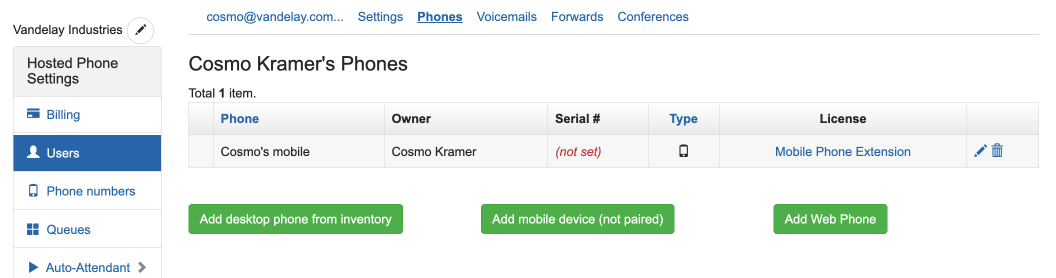
Additional settings for the new mobile phone can be accessed by clicking on Users and selecting the new user that you just created. From there, click on Phones and click the edit pencil.
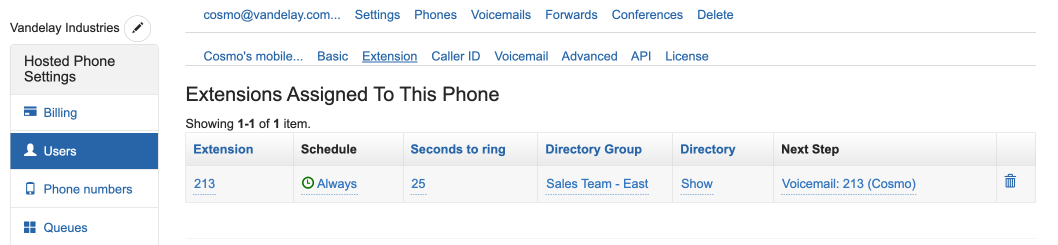
You then can click on Extension to edit the length of time the phone rings, or to change the next step if the user doesn't answer. In the Caller ID area you can set the Caller ID for outgoing mobile calls to whatever company number is appropriate.
¶ Conference Calling
Conference call lines can be added from within the admin panel or through each users mobile app.
¶ Dial-in Numbers
¶ Canada
| City | Number |
|---|---|
| Calgary | 403-879-0976 |
| Toronto | 647-258-6403 |
| Vancouver | 604-221-7022 |
| Toll free | 1-800-215-4913 |
¶ United States
| City | Number |
|---|---|
| New York | 917-675-5259 |
| Los Angeles | 323-395-5185 |
¶ International
| Country | Number |
|---|---|
| United Kingdom | + 44 (844) 9869671 |
| France | + 33 (9) 70777646 |
Then enter either the conference guest PIN, or the admin PIN to participate in the conference. The admin PIN provides additional functionality as per below.
For the conference to start, one user must be dialed in with an admin PIN.
¶ Pins
Conference PINS can be setup from the administrative portal at www.callerip.ca or from within the mobile app. Select “Conference” on the left navigation panel and then “Pins” on the top.

¶ In-conference dial options
¶ Locking a conference
Once the admin has all the necessary callers on the line, she can lock the conference to prevent other callers from joining by pressing 2. To unlock the conference, press 2 again.
¶ Adding a caller to the conference
In addition to calling in, callers can be added to the conference by an Administrator (any caller who dials into the conference with the administrative PIN) by pressing the 0 button during the conference and following the instructions. Expect to hear silence while the system connects the number you entered. You will be placed back into the conference once the caller is connected.
¶ Other administrative options
Conference admins (callers who used the admin pins) have the following dial options:
| Dial pad # | Feature |
|---|---|
| 2 | Lock and unlock the conference to restrict additional callers from joining. |
| 4 | Decrease listening volume |
| 6 | Increase listening volume |
| 7 | Decrease talking volume |
| 9 | Increase talking volume |
| 0 | Add a caller to the conference. Enter the number to call after the prompt. You and the person you are calling will be returned to the conference once he or she answers. |
¶ Phones
¶ Recording
Recording calls on a phone can be done by:
User level recording
- Setting the phone to record all calls in the Admin portal
- Dialing *3 while on a call (or pressing the Record soft key)
Admin level recording
- Selecting phone numbers to record incoming calls.
- Selecting phones to record outgoing calls.
This section deals with user level recording, which makes the recordings available to the user registered to the phone. Admin level recordings are for administrators and is independant of the recordings resulting from this section. See Call Recording for admin level recording.
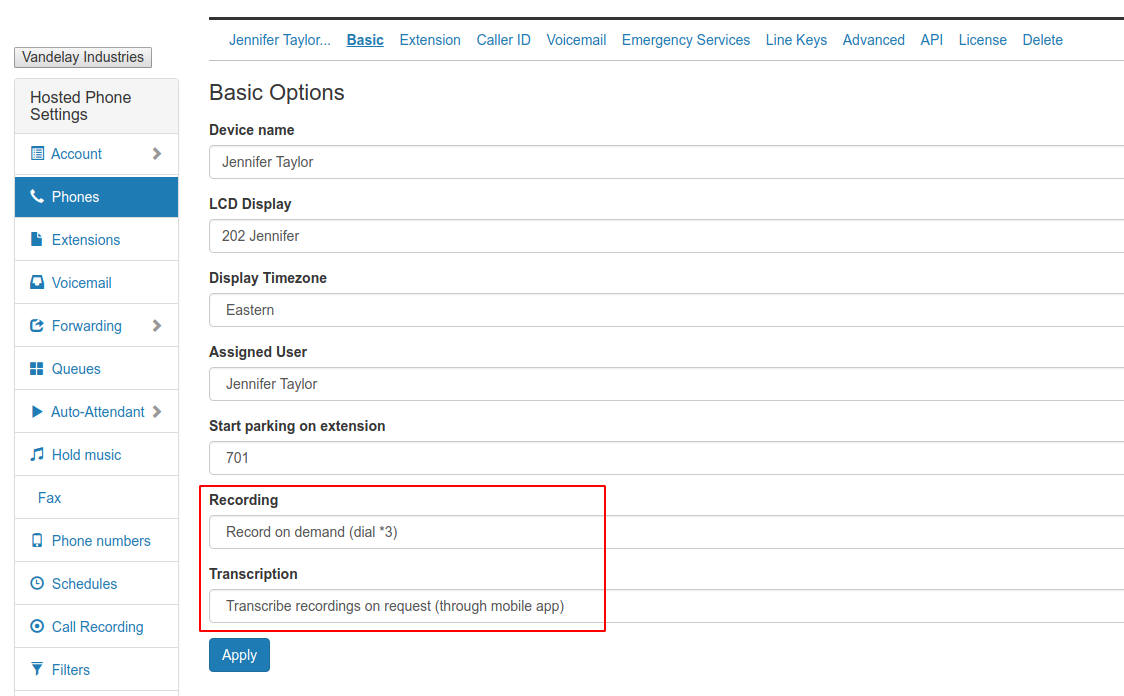
¶ 1. Setting the phone to record all calls
Choose Phones -> Select your phone -> Basic. Set the Recording and Transcription options accordingly.
¶ 2. Dialing *3 while on a call
Pro extensions can record calls on demand by pressing *3 while on a call.
¶ Transcriptions
¶ Licenses & Billing
To see the services you are subscribed to and your expected monthly bill, click on Billing & Licensing on the left panel, and then Licensing on the top navigation menu.
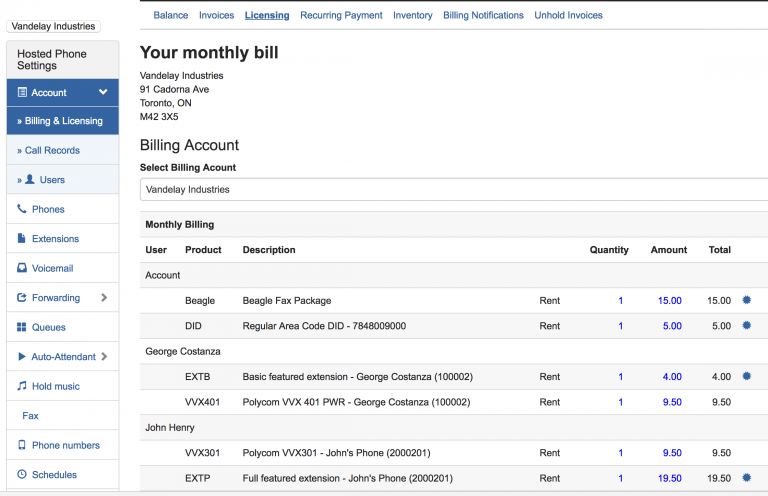
Licenses can be modified (change of plan, deactivated, or activated) by clicking on the certificate icon to the right of each item.
¶ Making changes to licenses
Changes can be made from:
- The Phones screen (for phone licenses)
- The Phone Numbers screen (for phone number licenses)
- The general Licensing page (for all licenses)
¶ From the phones page
¶ From the phone numbers page
¶ From the licensing page
By clicking on the certificate icon on the Licence page (or the License link from the Phones page, or the License link from the Phone Numbers page) you are directed to the License Detail page where you can do one of the following actions:
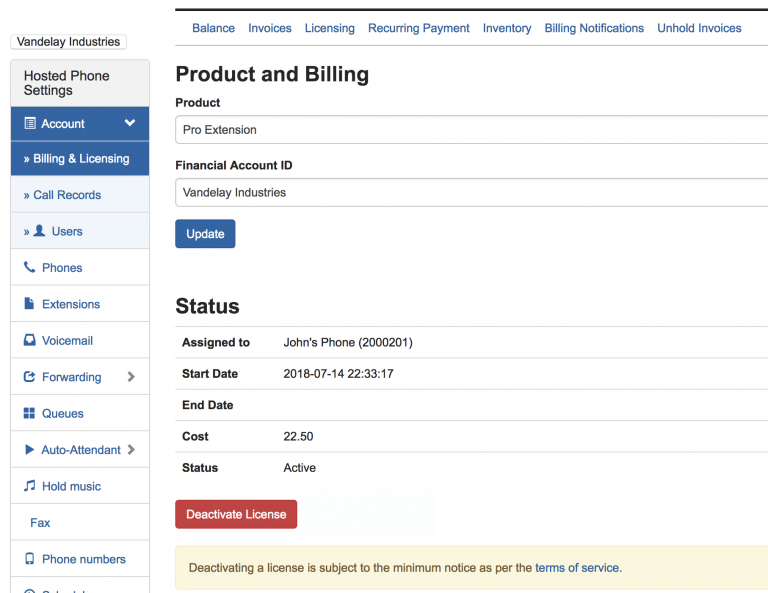
- Modify the license to another tier. For instance, you can change a Pro Extension to a Basic Extension or visa versa.
- Change the billing account the license is charged to (if you have more than one)
- Deactivate the license (subject to time restrictions depending on the service).