¶ Getting started
This section generally applies to the Polycom VVX 300, 400, 500 and 600 series phones. The 400 series phone is shown in most cases, but most functions and instructions apply to all phone models.
Start at the Phone Assembly section if your phone needs to be physically setup. Otherwise, skip to the 60 Second Quick-Start Guide.

¶ Phone assembly
¶ Phone cord
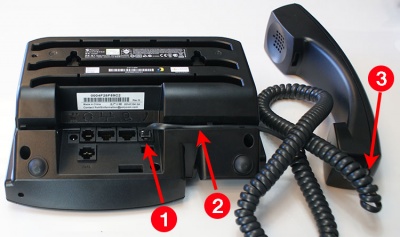
Plug the phone cord in as shown, with the flat end of the cord into the channel leading out to the side of the phone.
¶ Power
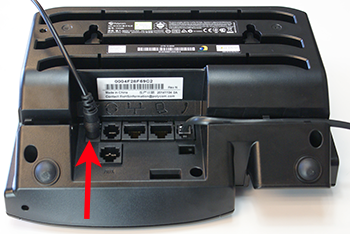
Plug the power adapter into the slot shown.
You may not have (or need) a power adapter. If your office network is setup with Power over Ethernet (PoE), the phone will be powered through the ethernet cable, as covered in the next step.
¶ Ethernet (network) connection
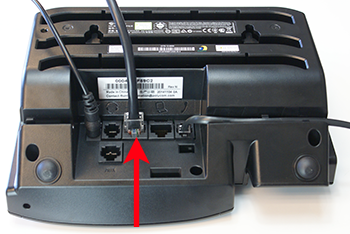
Connect the ethernet cable from the left network jack of the phone into your network.
The ethernet cable will also fit into the jack beside it to the right. That jack is for a different purpose (shown next). Make sure the network cable is in the correct (left) jack.
¶ Computer (daisy-chained) connection
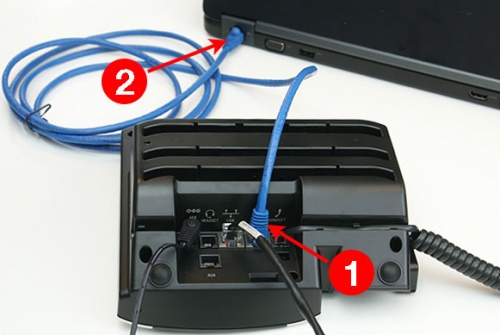
You can share your phone's network connection with another device, such as your work computer. To do this, plug an ethernet cable into the jack shown (back right side) and then into the computer's network connection.
¶ Phone stand
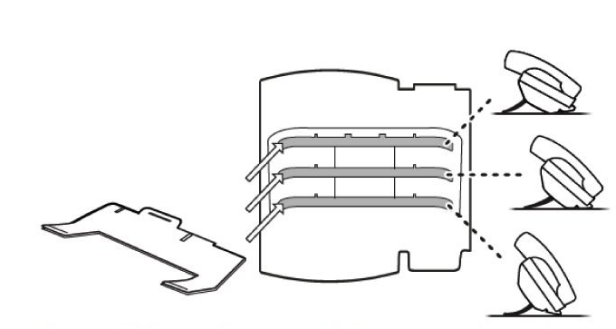
Insert the phone stand into one of the slots shown, depending how upright or flat you want the phone's face to appear.
¶ 60 Second Quick-Start Guide
To place a call, lift the receiver and dial the number. You don't need to select a line or dial 9 first. Simply lift the receiver and dial.
To answer a call, lift the receiver. You don't have to select a line or do anything else.
Scroll down to the applicable section based on which phone you have.
¶ Polycom VVX 400 series
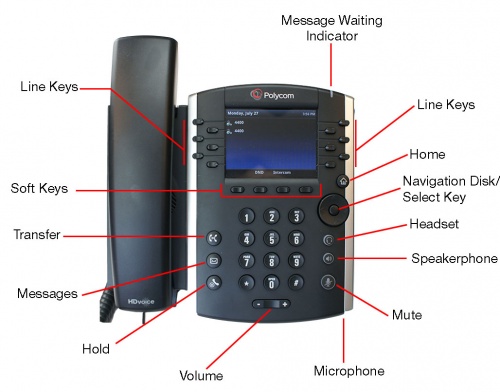
The buttons on the bottom half of the phone are mostly self-explanatory:
- Transfer is for transferring a call (covered in detail here).
- The Messages button takes you into your voicemail (covered in detail here).
- Hold places the active caller on hold.
- The Volume keys adjust the ringer volume (when you are not in a call) and adjust the call volume (during an active call).
- Mute silences your microphone but let's you still listen to the call.
- Pressing Speakerphone during an active call let's you hang up the receiver and continue on speakerphone. Pressing Speakerphone when you are not in a call, initiates a new call using the speaker. You can pick up the receiver at any time to go off speaker and use the receiver.
- If you have a headset, the Headset key switches the active call to use it. If you are not in an active call, pressing it initiates a new call using your headset.
The buttons on the top half of the phone fall into 3 groups:
- Line Keys run along the left and right sides of the display. They can be set by you or your phone administrator. They are generally used to place a specific call if you are not on the phone already, or if you are on a call, pressing one of them will transfer the call to the line/number. The button also has a light which goes solid red if your co-worker is on the phone.
As an example, a line key set to "203 Joe" can be pressed to initiate a call to Joe at extension 203. If you are already on a call, pressing that same line key will instantly transfer the caller over to Joe at extension 203.
- Soft Keys
¶ Answering the phone
¶ Voicemail
¶ Setup your voicemail greeting
To access your voicemail, press * followed by the mailbox number. Usually this matches your extension so if your extension is 201, press *201 to access your voicemail.
You then need to enter your PIN which is set up via the Rinble website admin portal. Ask your administrator or call 6-1-1 to speak to a Rinble support representative.
Once in, press 0 for advanced options and you can record a busy and an away greeting.
¶ Accessing your voicemail
Voicemails can be checked in one of 3 ways:
- On the phone
- By email
- In the mobile app
¶ On the phone
If the voicemail has been assigned to the phone in the admin portal, click on the voicemail button located on the phone. This should dial *[extension] to access mailbox administration.
If the mailbox is not assigned to your phone, you can dial * and your extension to get to the voicemail administration menu - to listen to messages or set your greeting.
¶ Voicemail to email
Voicemails can be sent to email, transcribed and with the audio attached. To enable voicemail to email, set the email address and set "Send to email" to "Yes" in the voicemail section of the web portal.
¶ In the mobile app
Click on the mail tab of the mobile app to see transcriptions of your past voicemails.
¶ Hold
Press the HOLD button to place the call on hold. The other party will hear hold music (which defaults to two beeps).
¶ Parking
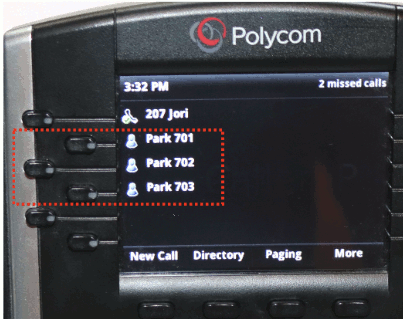
Parking a call is similar to putting a call on hold. The key difference is that any other phone may pick up the call. To park a call, press one of the park buttons and hang up the phone. To pick up a parked call, pick up the phone and press the (now red) park button. You can do this from any phone belonging to your organization.
For example, on the Polycom VVX phones, by default, the first 3 buttons are dedicated to parking - Park 701, Park 702 and Park 703. Line Keys, however, can be changed in the Control Panel.
¶ Recording calls
Pro Extensions can have their calls recorded by one of two ways:
- Set the phone to record all calls in the Admin Portal.
- While on a call, press the Record soft key button (or dial *3)
¶ Setting call record in the control panel
Calls can be recorded by setting Recording options in Admin Panel. Recording needs to be set separately for incoming and outgoing calls. Once the phone is set to record, recordings can be accessed in the mobile app and by email.
¶ Using the Record softkey
On the Polycom phones, while on a call, press the "More" softkey and then Record. If not on a polycom, dial *3 while on the call.
¶ Transcribing calls
Pro extensions can have their recordings transcribed by setting the option Transcribe all Recordings in the Admin Portal. (see your administrator).
¶ Paging
Paging is available on Polycom VVX and Soundpoint phones:
- Press the Paging soft key on the screen display.
- With the Default: All Phones selected, press the Page softkey
https://www.youtube.com/embed/Y8PWYTGHKBA
¶ Mobile App
Rinble has a mobile app that allows you to:
- Place and receive phone calls using your business caller id.
- View your transcribed voicemails.
- Listen to your recordings or read the call transcripts.
- Manage your confernece lines.
- Send messages.
See the Mobile app documentation for more information.
¶ Messaging
Use the mobile app to messaging other users at your workplace or to send and receive SMS texts.
See the Mobile app documentation for more information.
¶ Conference calls
There are two types of conference calls available to Rinble phone clients.
- The conference call features available on your desk phone.
- The Rinble conference call system with external dial-in numbers, guest pins, and hosting pins.
This section deals with the first option, the conference call features available on your desk phone. To learn more about the Rinble conference call system go to the Conference Call Guide
On the Polycom VVX phones:
Join two calls together.
- Make or receive the first call
- Click More and then Confrnc
- Dial the next number and press Send.
- Wait until the call is connected.
-
Click More and then Confrnc
Split the conference into two separate calls
- Press Split
- Use the Arrow keys to select which call to resume and press Resume
¶ Transfers
To transfer a call to another extension or line you can use the #7 dialpad feature code or use the softkeys available on the phone while on a call (each type of phone is a little different).
Transfer with the dialpad (#7)
While on a call, you can transfer a call by:
- Press #7.
- Wait for the dial tone
- Dial the number or extension you are transferring to.
The transfer is executed as a Blind transfer meaning that once you dial the extension to transfer to, you are disconnected from the call.
This feature code is handy to learn as you can use it on all phone types including your mobile application.
¶ Transfer to voicemail
To transfer to a voicemail (bypassing the transferee's phone) transfer to 0 plus the extension. For example, to transfer directly to the voicemail for extension 227, transfer to 0 2 2 7.
¶ Click-to-call
Install the Click 2 Call Chrome extension to dial phone numbers on your phone by clicking them in your computer's Chrome browser.
Once installed, you need to give the extension your phone's token. This associates the browser extension and your desktop phone. Retreive the token from the Admin Portal by selecting Phones -> Choose your phone from the list -> Select API from the top menu.
Then enter the token in the browser by clicking the Click-2-Call icon on the top right of your Chrome browser.
